Posts about Programming

Learning Java
Java comes with Java tutorials. This is learning from the source.
Here are a couple of free sites to learn Java basics.
  • LearnJava
  • Javabeginner
  • the new boston education Video site
Exercises
  • codingbatThis site has a bunch of small exercises where you are presented with small problems and have the ability to code your answers directly on the site. It uses a concept called unit testing to determine if your solution was coded correctly.
  • Practice-ItThis site is more of the traditional question and answer. Good knowledge tests.
Traverse these sites wisely. They are sites not maintained by the team, the school, nor anyone associated with the team. The sites are run by adding advertising on the sties. There is nothing that needs to be downloaded from these sites except for the knowledge contained on the pages. Browse wisely.

Bonus Programming Task

After seeing a number of teams at CVR in the stands doing scouting on paper, and seeing people walking around the pits talking to teams and taking notes and seeing several team members in the stands with computers, I thought about combining all those things. I have seen a number of teams out there that have scouting applications, however I have never downloaded and used them. I don’t know the ease of the applications nor what is collected.

It would be relatively easy to produce an application to use for this purpose. Eventually, it could be a mobile application, but initially it does not. It could be an application or even a web site that could be run on a laptop.

The first step in doing something like this is determining the requirements. After talking with Christopher, some things that came up were:

Bot Information (Information about functions of the bot)):

  • Team
  • Name
  • Picture
  • Starting location
  • Climbing Mechanism
  • Feeder Method
  • Adjustable shooter

Performance (Information about how the bot does in matches):

  • Match
  • Shots taken
  • Shots made
  • Hang points
  • Shot location
  • Overall Rating
  • Notes

We can write this information to a local database and use import/export functions to combine information between computers.

This is just a quick list and we would have to determine not only how to collect the information, but how to make the information useful to us. Minimally, we could use it for alliance selection and/or selling our bot to those making alliance selections.

This won’t be an easy task, but could have a nice payoff. If you have questions, post on the board or send me an email (jrutten at pacbell dot net).

Posted in: Programming

Interesting Read for Programmers

http://wpilib.screenstepslive.com/s/3120

Posted in: Programming

WPI Study Guide

Here is the basics of what we discussed about yesterday, I will go over the three main parts of the robots and a couple concepts.

Command Based Robot: A robot that takes commands from the user (or programmer) and each subsystem executes one command at a time.

Command: An action for the robot to execute using one or more subsystems.

CommandBase: The base for all commands. We use it to declare static instances of every subsystem.

Subsystem: A part of the robot. Ex. Arm, flinger etc… It can only execute one command at a time.

Command breakdown:

  1. Constructor: Used rarely on the robot, use initialize instead. Only used in special cases.
  2. Initialize: Used to initialize values and do initial actions of the command.
    IMPORTAINT: Put the requires(subsystem of choice) in here Every Time for Every subsystem the command requires to execute.
  3. Execute: The instructions for the command to execute. It is called over and over.
  4. isFinished: Check if the command is finished? Put logic here to tell the command weather its finished. A return value of true means the command is done executing.
    Tip: if you want a command that always runs, just return false.
  5. End: Called when the command is finished. Put anything that the robot has to stop doing after the command here.
  6. isInterrupted: This is called when another command that requires the same subsystem (or subsystems) overriding this commands control.

 CommandBase breakdown:

  1. Put every public and static instance of every subsystem here.
    Ex. public staticDriveTrain drive = newDriveTrain();
  2. Put every subsystem to the SmartDashboard here. (To be explained later)
    Ex. Smartdashboard.putData(drive);

Subsystem breakdown:

  1. In the constructor of the subsystem class, execute setDefaultCommand(default Command) and initialize any values.
  2. Use methods to implement functionality of the robot to be used by commands.
    Ex. public void tankDrive(double left, double right){

    }

Make sure you are able to understand what these concepts are when we ask you about them!

Posted in: Programming

Programming Meeting 12/9, Sunday

We will meet from 10am – noon. We will be discussing WPI and driving the robot around, hopefully.

I will make another blog post about what we discussed on Friday, make sure to brush up on those terms.

Thanks,
James Womack

Posted in: Programming, Team

Programmer Meet Sunday

There will be a programming meeting this Sunday, November 18, 2012 starting at 10am and ending at noon.

Best be there, will be programming robots.
‘Cause we will be learning WPI library basics.

Posted in: Programming

Study Guide for programming

Submitted by James Womack

I will post all of the terminology that you will need to know for a test of programming knowledge. Bolded terminology has a 98% chance of being on the test!

Top three scores will get a small pizza courtesy of me.

Lets get started:

Statement: A line of code that performs an expression(s) proceeded by a semi-colon.
Example: System.out.println("Hello World");

Variable: Variables in java hold data, there are many types of data.
How to construct a variable: Access Modifier type name (= type of data);
Example: int age = 10;

Basic Variable Types:

  • int – A numerical type that holds Whole numbers (Integers hint hint) that can range from a value of -2,147,483,648 to 2,147,483,647
  • byte – Like int but can only hold one byte of data (values from -128 to 127)
  • short – Like int but can only hold 16 bits of data (Values from -32,768 to 32,767)
  • double – A double precision floating number (Decimal)
  • float – A single precision floating number (Decimal)
  • long – Like int but holds 64 bits of data (ask us for max, its VERY big).
  • boolean – A true/false bit.
  • char – A single character like ‘a’

If, else , if else statements: If a specified condition is meet, then the code block is executed, else the else code block is executed.
How to construct:
if (condition) {
...
} else {
...
}

Example:
if (age >= 18){
System.out.println(“You are an adult“);
} else {
System.out.println(“You are a minor“);
}

Conditional Operators:

  • Greater than is >
    • Example: 10 > 12 = false.
  • Less than is <
    • Example: 10 < 12 = true.
  • Greater than or equal to is >=
    • Example: 12 >= 12 = true.
  • Less than or equal to is <=
    • Example: 12 <= 13 = false
  • Equal to is == (NOT =)
    • Example: 12 == 12 = true
  • Not Equal to is !=
    • Example: 12 != 13 = true
  • Or is ||
    • Explanation: If one side is true, the whole thing is true
    • Example: 12 == 11 || 12 < 13 = true
  • And is &&
    • Explanation: Only true if both sides are true
    • Example: 12 == 10 && 12 > 10 = false
  • Not (opposite) is !
    • Explanation: It gives back the opposite of what is true. (Use with parenthesis)
    • Example: !(12 > 10) = false
  • Important element of logical comparisons (|| and &&) is that they are evaluated from left to right and will not evaluate the right side if not needed.

 For and While loops: Control flow operators that put a program into a loop until certain conditions are met or the break keyword is executed.
How to construct: 
for (variable initializer; conditional-operation check; post-loop operation){

}
while (condition is true){

}
Example:
int factorial = 5;
int product = 5;
for (int i = 0; i < factorial; i++){
product = product * i;
System.out.println("Factorial is at: " + product);
}

int number = 0;
while (number != 10){
System.out.println(“Number is: ” + number);
number++;
}

Functions (Methods): A piece of code that is executed when called. They can take arguments (variables passed onto the method) and return values (data).
How to construct:
access modifier return type name(arguements){
...
return variable(or value); - if not void (No return type)
}
Example: 
public void setAge(int age){
this.age = age;
}
public int getAge(){
return age;

—————————————————————————————————————–

OOP: Object orientated programming, a programming methodology that uses objects (usually classes) to design computer applications and programs.
Key Terminology: 

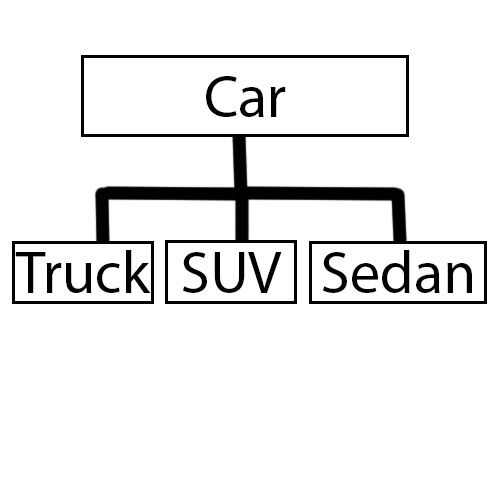
  • Lets use this graph for the terms.
    Photobucket
  • Inheritance: Reuse existing objects to create specialized types or sub-classes. In this graph, Truck, sedan, and SUV are children of car, they contain all methods, and variables of Car  and can call upon those methods or variables as long as they aren’t private.
  • Encapsulation: The use of access modifiers (public, protected, private) to control access to methods and variables. Think getters and setters.
  • Polymorphism: Creation of methods that take more than one form…
    Example:

        In car class method Honk says “Honk!!”
        but… In Sedan class method Honk is Overloaded (existing method with different arguments or in a inherited class with same arguments  and now Honk says “Beep!”.


Classes:  
Objects that are containers for variables and methods and can be inherited (extended), abstract, and among other things.
How to construct:
access modifier class name {
...
}
Example:
public class Person{
private int age;
private String name;
private String Profession;
public int getAge(){
return age;
}
}

Constructors and the new keyword: Constructors are functions called when a class is created, they have no return type specified because they return an instance(a created object of the class) of the class. The new keyword calls the constructor (if its public) with any specified arguments and creates the space to hold the new instance.
How to Construct:
access modifier -(usually public)- class name(arguments){
...
}
Example:
 public Person(int age, String name){
this.age = age;
this.name = name;
}

this keyword: A keyword that references to the current instance. Usually used to separate argument variables from the ones in the class.
How to construct:
this.name of variable = something;
Example:
this.name = name;

Access Modifiers: Access Modifiers control the encapsulation of the class and its methods and variables. They control what the outside classes can see of a certain class.
Modifiers:

  • public: Everyone can see the method or variable or class.
  • private: Only the class containing the method, variable or class can see it.
  • protected: Only the class and its children(all classes that inherit that class) can see the method, variable or class



Posted in: Programming

Lesson 1 (from Sunday October 14th 2012)

Basically I will post the presentation that we made.

We are meeting on Sunday from 10-12 AM and I want all of the programmers to be there if you can come. 

Slide 1 (Which is slide 3 on the actual presentation):

  • “A statement in Java forms a complete command to be executed and can include one or more expressions.”
  • Example:
    • System.out.println(“Hello World”);
      • Lets break this down:
        • This statement prints out hello world to a console.
        • The System.out.printLn accesses a function of printLn in the system library (package).
        • The () Pass on arguments to the printLn Function, in this case, the “Hello World” string (to be explained later).
        • The Semicolon (;) ends the statement.
        • Important:  Every statement ends with a semicolon! Remember where that key is!

Slide 2 (Variables):

  • Variables in Java hold data, there are many types of data for variables (which we will go over in a later slide).
  • Here is a basic example of a variable:
    • int numberOfPeople = 10;
    • Lets break down this statement:
      • int is the type of variable it is.
      • numberOfPeople is the name of the variable.
      • The equals sign (=) assigns the variable some value of the same datatype (in this case 10).
      • The semicolon (;) ends the statement.

Slide 3 (Basic Data Types):

  • int – A numerical type that holds Whole numbers (Integers hint hint) that can range from a value of -2,147,483,648 to 2,147,483,647
  • byte – Like int but can only hold one byte of data (values from -128 to 127)
  • short – Like int but can only hold 16 bits of data (Values from -32,768 to 32,767)
  • double – A double precision floating number (Decimal)
  • float – A single precision floating number (Decimal)
  • long – Like int but holds 64 bits of data (ask us for max, its VERY big).
  • boolean – A true/false bit.
  • char – A single character like ‘a

Slide 4 (Control Flow Statements):

The if statement evaluates a given condition, if it is true, then it will execute it, if not it will look for an if else or else to evaluate and execute.
Example:
  • int age = 21;
    if (age  >= 21){
    System.out.println(“You can now drink…”);
    } else {
    System.out.println(“You can’t Drink!”);
    }
  • Lets break this down:
  • The int age = 21; declares a variable of Age with the initial value of 21.
  • The if starts a conditional operation. That conditional operation can be translated like this:  (If Age is Greater Than or equal to (>=) 21) ({)Then…
  • ¨Execute System.out.printLn(“You can now drink…”);
  • (})Else({)…
  • ¨Execute System.out.printLn(“You can’t Drink!”);
  • End of if (})


Slide 5 (Control Flow Operators):

  • Greater than  is >
    • Example:  10 > 12 = false.
  • Less than is <
    • Example: 10 < 12 = true.
  • Greater than or equal to is >=
    • Example:  12 >= 12 = true.
  • Less than or equal to is <=
    • Example:  12 <= 13 = false
  • Equal to is == (NOT =)
    • Example:  12 == 12 = true
  • Not Equal to is !=
    • Example: 12 != 13 = true
  • Or is ||
  • Explanation: If one side is true, the whole thing is true
    • Example:  12 == 11 || 12 < 13 = true
  • And is &&
  • Explanation: Only true if both sides are true
    • Example: 12 == 10 && 12 > 10 = false
  • Not (opposite) is !
  • Explanation:  It gives back the opposite of what is true. (Use with parenthesis)
    • Example:  !(12 > 10) = false
  • Important element of logical comparisons (|| and &&) is that they are evaluated from left to right and will not evaluate the right side if not needed.

Slide 6:

  • An Array is a sequence of values in a numbered index.
  • Important: All arrays begin at the index of 0.
  • A for loop is a loop that has an initializer, control statement, and end of loop operation.  It is commonly used to loop through a set of values.
  • Example:
    • String[] names = new String[4];
      names[0] = “James”;
      names[1] = “Dev”;
      names[2] = “Mr. Rutten”;
      names[3] = “Mr. Donlon”;
      for (int i = 0; i < names.Length;  i++){
      System.out.println(“Name Number: ” + (i + 1) + “ is “ + names[i]);
      }
  • Lets Break this down:
    • This prints out all the names: James, Dev, Mr. Rutten, Mr. Donlon with formatting.
    • The first line declares a String(a class type) Array with 4 elements.
    • Lines 2-5 give each element a name.
    • Translation of line 6: for the integer (int) index (i) equals 0 (I = 0), while the index < the length of the  names array (i < names.Length), increment the Index by one ( i++) )
    • The 7th line prints out each name in a fancy formatting.
Slide 7 & 8 (Functions):
  • Methods are pieces of code that are executed when they are called. println is a method, so is anything that has a name and a set of parenthesis (something()).
  • A method can return a value and take arguments.
  • Important: Every java program starts in a special method called main. The declaration of this method is this: public static void main(string[]args){…}
    • Example:
    • public void PrintSillyMessage(){
      System.out.println(“I like turtles”);
      } …
      public static void main(string[] args){
      PrintSillyMessage();
      }
  • Lets break this down:
    • The public void PrintSillyMessage() declares a method that is accessible to everyone (public) and returns nothing (void) that is named PrintSillyMessage.
    • The System.out.Println function prints to the console “I like turtles”.
    • Inside the main function (where the program starts), it calls the PrintSillyMessage which then prints the message “I like turtles”.

Arguments Part:

Arguments to methods are inserted so:
  • Example:
    • public void PrintMessage(String message){
      System.out.println(“You wanted to say “ + message);
      }
      Public static void main(string[] args){
      PrintMessage(“I’m in a cubicle… Going crazy”);
      }
  • Lets break this down:
    • The first line declares a public method that returns nothing named PrintMessage that takes the string argument of message.
    • The second line prints out the message
    • The main method calls PrintMessage with the arguments of “I’m in a cubicle… Going crazy”.
Slide 9 (Combination Slide):

Lets combined what we discussed and break it down together!

public static String[] names;
public static void main(string[] args){
names = new String[4];
names[0] = “James”;
names[1] = “Dev”;
names[2] = “Mr. Rutten”;
names[3] = “Mr. Donlon”;
GoThroughNames();
}


public static void GoThroughNames(){


for (int i = 0; i < names.Length; i++){

if (names[i] == “James”){
System.out.println(“Dev is wrong, I am right”);
}
else if (names[i] == “Dev”){
System.out.println(“James is wrong, I am right”);
}
else if (names[i] == “Mr.Rutten”){
System.out.println(“Is it done yet?”);
}
else if (names[i] == “Mr. Donlon”){
System.out.println(“I work at intel.”);
}
else {
System.out.println(names[i]);
}

}

}

Posted in: Programming

Java Coding Site

Here is an interesting Java coding site that you can practice your coding skills: http://codingbat.com/java

Posted in: Programming

SVN Repository Access

The Google code project as at https://code.google.com/p/firstteam3189. This is publicly available to view but you need a google account to be able to submit to the repository. Email me at jrutten (at) pacbell (dot) net if you need commit access.

On windows, I like to use TortoiseSVN to interact with the repository: http://tortoisesvn.tigris.org/

Here is a good writeup on how to set up a project with google code: http://mzaher.wordpress.com/2009/03/02/how-to-use-svn-with-google-code/
You should just need to do steps 1 – 7.

Posted in: Programming, Team

Controls

You need a dedicated Driver and Gunner for the Robot, the Driver contols the Cultivator System, Funnel System, Balance System  and driving the robot around while the Gunner controls the Turret and Solenoid for firing the ball and also monitors the Dashboard (To be elaborated on in a later post)

This is the post on the Controls of the Robot

The driving Controls consists of 2 Joysticks for the Driver and a Gamepad for the Shooter

One joystick contains 11 buttons (4 Buttons on top, 1 Trigger, 6 on the base), 3 axes (2 for X & Y and one throttle)

Logitech ATK3 Joystick

Logitech ATK3 Joystick Buttons

The Gamepad contains 12 buttons (4 on the top, 4 on the right base, 1 per joystick, 2 in the middle), 6 axes (2 for each X&Y on the thumbsticks and there are two thumbsticks,  and 2 for the D-pad but the D-pad is not a variable control)

Logitech DualAction Buttons

Logitech DualAction Button Locations

For the Gunner the Left Joystick X-axis controls the rotation of the turret, the Right Joystick Y-axis controls the turret Shooter Speed if manual control is enabled.

Left Joystick Controls

Left Joystick Controls

Right Joystick Controls

Right Joystick Controls

For the Driver the Control system is split between two joysticks with the Cultivator Systems and Balance Systems on the Right Joystick, and The Funnel System on the left Joystick. The Drivetrain of the robot is a Tank drive system with each joystick feeding power independently to both sides.

GamePad Controls

GamePad Controls

Here is a full list of the Controls and Important Warnings (at the bottom)

Robot2012 Controls

Joystick 1 = Right Joystick     Joystick 2 = Left Joystick


Button Action
Joystick 1   #2 Cultivator System Reverse(Ejects balls from Robot)While Held
Joystick 1   #3 Cultivator System On(Suck in Balls)
Joystick 1   #4 Cultivator System Off(No Power To Elevator)
Joystick 1   #5 Cultivator System Off(No Power To Elevator)
Joystick 1  #11 Balance Calibration Mode(Not For Competition)
Joystick 2   #2 Funnel Down(Lower Funnel) while held
Joystick 2   #3 Funnel Up(Raise The Funnel)while held
Joystick 2   #6 Reset Gyro(Set Current Gyro Angle To 0)
Joystick 2   #7 Activate Balance(Auto Bridge Balance)While Held
GamePad   #1 Stop Turret(Set Turret Speed To 0)
GamePad   #2 Stop All(Stop All Systems)
GamePad   #4 Start Turret(Set Turret Speed To 1)
GamePad   #5 Reset Camera()
GamePad   #7 Send Camera Data()
GamePad   #8 Shoot Ball
GamePad  #9 Start Kinect Drive
GamePad  #10 Activate Tank Drive
GamePad  #12 Activate Manual Turret Control


Joysticks Use
Left Joystick (2) Tank Drive Mode: Control Left Track
Right Joystick (1) Tank Drive Mode: Control Right Track
GamePad Right Y Manual Turret Control
GamePad Left X Manual Turret Rotation

Warning: Do NOT set “maxSpeed” variable over 0.____! (this could break our and other teams robots.)
Warning: Do NOT set “lowBalanceAngle” variable under 3! (may cause uncontrollable movement back and forth and make robot fall off bridge breaking the robot.)
Warning: Be sure the Bottom value in the editable values match the top! (if they don’t you could have wrong values and crash robot due to noncalibration.)
Warning: When resetting gyro (Leftstick Button #10) be sure robot is NOT in motion.
Warning: Do NOT Change field of view unless target distance is wrong by more than 5 feet.
Warning: Do not reset Camera unless corrupt camera feed.
Warning: Do Not use Kinect during Teleop .
Warning: Stop All System Should only be used in emergencies.
Warning: Do Not adjust turret speed too quickly.